Published: Oct 6, 2026 by Brandon Jones
When WebGPU first shipped back in 2023, one of the biggest gaps that it had relative to its native counterparts was that it didn’t support bindless resources. Happily, WebGPU is on the cusp of supporting bindless texture sampling, with other resource types coming after that! You can try it out today in your own pages, and see a live example of it in action at emojigraffiti.com.
The traditional binding model
Typically when developing with WebGPU you choose which resources (textures, buffers, samplers) can be accessed by the current render pipeline by placing them into Bind Groups. The bindings must be carefully coordinated between the shader, a Bind Group Layout, and the Bind Groups themselves. I wrote much more on the subject in my Bind Group best practices article if you want to know more.
The way this works in many renderers is that you’ll have some bind groups that are shared between multiple objects or an entire scene containing common data like camera uniforms or environment maps, and then one bind group per mesh or material that just contains the textures or matricies used by that object. Unfortunately creating and setting bind groups has some overhead, and while effective use of instancing and other data-packing tricks can reduce the total number of bindings needed, it’s still something that needs to be handled carefully by any efficient renderer.
A (very) simplified snippet of a renderer using a bind groups would look something like this:
//
// "Bindful" renderer
//

// Setup
const meshShader = device.createShaderModule({
  label: 'Mesh',
  code: `
    struct Camera {
      projection: mat4x4f,
      view: mat4x4f,
    };
    @group(0) @binding(0) var<uniform> camera: Camera;
    @group(0) @binding(1) var environmentCube: texture_cube<f32>;

    struct Mesh {
      model: mat4x4f,
      baseColor: vec4f,
    };
    @group(1) @binding(0) var<uniform> mesh: Mesh;
    @group(1) @binding(1) var colorTexture: texture_2d<f32>;
    @group(1) @binding(2) var metallicRoughnessTexture: texture_2d<f32>;
    @group(1) @binding(3) var meshSampler: sampler;

    // ... Vertex entry point omitted

    @fragment
    fn fragMain(@location(1) uv: vec2f, @location(2) normal: vec3f) -> vec4f {
      let color = mesh.baseColor * textureSample(colorTexture, meshSampler, uv);
      let metalRough = textureSample(metallicRoughnessTexture, meshSampler, uv);
      let env = textureSample(environmentCube, meshSampler, normal);

      return pbrShade(color, metalRough, env);
    }
  `
});

// ... pipeline and bind group layout ommitted

const frameBindings = device.createBindGroup({
  label: 'Frame',
  layout: frameBindGroupLayout,
  entries: [{
    binding: 0,
    resource: cameraUniforBuffer,
  }, {
    binding: 1,
    resource: environmentCubeMap,
  }]
});

for (const mesh of meshes) {
  mesh.meshBindings = device.createBindGroup({
    label: 'Mesh',
    layout: frameBindGroupLayout,
    entries: [{
      binding: 0,
      resource: mesh.uniforBuffer,
    }, {
      binding: 1,
      resource: mesh.colorTexture,
    }, {
      binding: 2,
      resource: mesh.metallicRoughnessTexture,
    }, {
      binding: 3,
      resource: defaultSampler,
    }]
  });
}

// Render Loop
const pass = encoder.beginRenderPass({
  // ...snip
});


pass.setBindGroup(0, frameBindings);
pass.setPipeline(meshPipeline);
for (const mesh of meshes) {
  pass.setBindGroup(1, mesh.meshBindings);
  pass.setVertexBuffer(0, mesh.vertexBuffer);
  pass.setIndexBuffer(mesh.indexBuffer, 'uint32');
  pass.drawIndexed(mesh.indexCount);
}

pass.end();
Using Bindless
WebGPU’s upcoming bindless texturing model, on the other hand, allows you to throw most or all of the textures needed by an entire scene into one big Resource Table and access any of them via an index in your shaders. That index still get passed to the shader through a traditional means, like a bind group or immediates, but it allows for a much more dynamic usage of the textures in the shaders themselves. You can get an idea of how it works by looking at this re-write of the above snippet to use bindless texture sampling:
//
// Bindless renderer
//

// Setup
const meshShader = device.createShaderModule({
  label: 'Mesh',
  code: `
    struct Camera {
      projection: mat4x4f,
      view: mat4x4f,
      environmentMap: u32,
    };
    @group(0) @binding(0) var<uniform> camera: Camera;

    struct Mesh {
      model: mat4x4f,
      baseColor: vec4f,
      color: u32,
      metallicRoughness: u32,
      sampler: u32,
    };
    @group(1) @binding(0) var<uniform> mesh: Mesh;

    // ... Vertex entry point omitted

    @fragment
    fn fragMain(@location(1) uv: vec2f, @location(2) normal: vec3f) -> vec4f {
      // New: Get the resources from the resource table
      let colorTexture = getResource<texture_2d<f32>>(mesh.color);
      let metallicRoughnessTExture = getResource<texture_2d<f32>>(mesh.metallicRoughness);
      let environmentCube = getResource<texture_cube<f32>(camera.environmentMap);
      let meshSampler = getResource<sampler>(mesh.metallicRoughness);

      let color = mesh.baseColor * textureSample(colorTexture, meshSampler, uv);
      let metalRough = textureSample(metallicRoughnessTexture, meshSampler, uv);
      let env = textureSample(environmentCube, meshSampler, normal);

      return pbrShade(color, metalRough, env);
    }
  `
});

// ... pipeline and bind group layout ommitted

const resourceTable = device.createResourceTable({
  size: 1024 // Number of resources, not bytes. Something big enough for your scene.
});

const envMapIdx = resourceTable.insert(environmentCube);
SetInBuffer(cameraUniforBuffer, 128, envMapIdx);

const frameBindings = device.createBindGroup({
  label: 'Frame',
  layout: frameBindGroupLayout,
  entries: [{
    binding: 0,
    resource: cameraUniforBuffer,
  }]
});

for (const mesh of meshes) {
  const colorIdx = resourceTable.insert(mesh.colorTexture);
  const metalRoughIdx = resourceTable.insert(mesh.metallicRoughnessTexture);
  const samplerIdx = resourceTable.insert(defaultSampler);
  SetInBuffer(mesh.uniforBuffer, 64, colorIdx);
  SetInBuffer(mesh.uniforBuffer, 68, metalRoughIdx);
  SetInBuffer(mesh.uniforBuffer, 72, samplerIdx);

  mesh.meshBindings = device.createBindGroup({
    label: 'Mesh',
    layout: frameBindGroupLayout,
    entries: [{
      binding: 0,
      resource: mesh.uniforBuffer,
    }]
  });
}

// Render Loop
const pass = encoder.beginRenderPass({
  // ...snip
  resourceTable: resourceTable,
});

pass.setBindGroup(0, frameBindings);
pass.setPipeline(meshPipeline);
for (const mesh of meshes) {
  pass.setBindGroup(1, mesh.meshBindings);
  pass.setVertexBuffer(0, mesh.vertexBuffer);
  pass.setIndexBuffer(mesh.indexBuffer, 'uint32');
  pass.drawIndexed(mesh.indexCount);
}

pass.end();
There’s a few things to take note of here. The most obivous is that we can now using a single
GPUResourceTable for all of the textures, regardless of where they are used. Instead of binding
the textures directly as part of a bind group when we want to use them we instead pass the index for
the texture that we received when inserting it. It’s important to know that you can mix and match:
Textures can still be passed as part of a bind group, even when a Resource Table is being used.
The next thing to note is that, at least in this example, it didn’t actually reduce the number of
bind groups of the frequency of binding. That may lead you to wonder what the benefit is? There’s a
few answers to that! One is that depending on the structure of your rendering algorithm using
bindless texture sampling may allow you to get rid of some bind groups! (Probably not all of all of
them, but that’s OK!) If all your instance data is stored in the frameBindings, for example, you
could get away with not using any bindings per-mesh and instead reference the instance data with either
immediates or changing the firstInstance value in the draw call. The other benefit is that using
bindless textures unlocks a class of algorithms that either wasn’t possible or was quite awkward to
implement with the traditional binding model. Think of ray tracing, where a single ray may hit
any number of meshes in the scene and it’s nearly impossible to predict in advance. That implies
that you need to have access to the textures for any mesh at any time, which is what bindless
texture sampling delivers.
In case it’s not obvious: This is not a comprehensive overview of how
GPUResourceTables work. There are, for example, other ways to manage the resources in the table besidesinsert()that allow more flexibility while requiring more care on the part of the developer. See the Bindless proposal document for full details.
Bindless in practice
Bindless texture sampling is available for testing in Google Chrome on Windows, Linux, and Android. MacOS support will be coming soon. Since it is still considered experimental, it requires that you enable the “Unsafe WebGPU Support” flag in Chrome’s about:flags page. Please note that this is for development only and you generally should not do your day-to-day browsing with that flag enabled.
To demonstrate a scenario where bindless texture sampling enables or improves a renderer’s ability to achieve the effects it wants, I created emojigraffiti.com. It places you in a simple “gallery” environment with a spray can that can draw any emoji you want (and a few extras) onto the walls, giving you a canvas to decorate as you see fit!
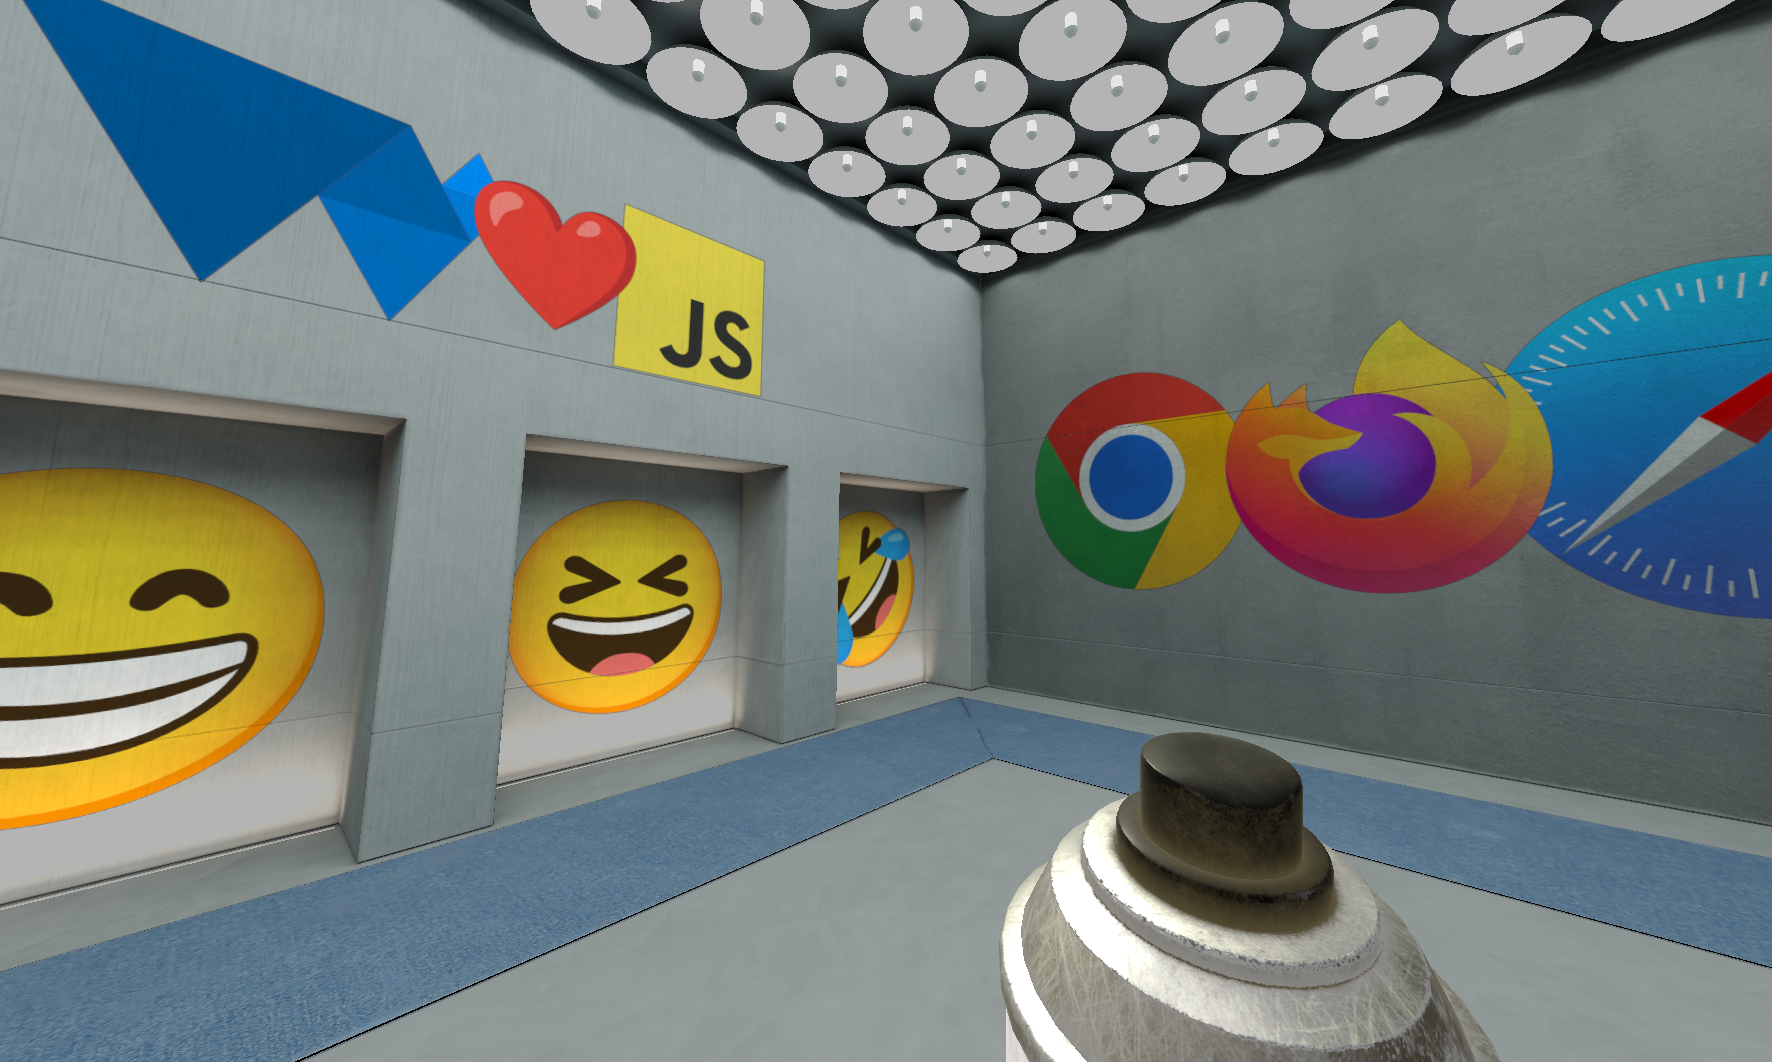
In terms of rendering, the emoji “tags” are drawn as projected decals on the scene geometry, rendering as part of the room geometry itself rather than as a separate mesh. This has several advantages, such as allowing the decals to automatically conform to the shape of the environment, not requiring hardware alpha blending, and completely eliminating Z fighting even for many stacked decals.
The challenge is that every surface that can have decals applied to it needs to be able to sample from any decal texture at any time. The surfaces don’t know in advance which decal projection frustums intersect with them, that’s computed on a per-fragment basis. There are 1922 emoji available in the emoji picker UI, plus a few additional logos I added. It would be completely impractical to bind nearly 2000 textures per-mesh with the traditional binding model, so bindless is the clear path to enabling such a flexible use case!
Texture arrays as an imperfect fallback
If you visit https://emojigraffiti.com without enabling “Unsafe WebGPU Support” you’ll notice that it still renders correctly. Given what I just said about it being impractical without bindless, you might be wondering how it still works?
The answer is that when bindless texturing isn’t available I am using a 2D array texture with many layers to do a rough emulation of bindless texturing. In terms of usage this actually end up being surprisingly similar! You still are referencing texture by index, with the main difference now being that the index refers to a given layer of a single huge texture. You have to manage texture uploads a bit more carefully, but the actual change to the shader is minimal. In fact, here’s the whole snippet:
// #if/#else/#endif syntax here is part of my own preprocessing library, not WGSL.
#if ${args.useBindless}
  fn getDecalColor(decalIndex: u32, texCoord: vec2f) -> vec4f {
    let tex = getResource<texture_2d<f32>>(decalIndex);
    return textureSample(tex, defaultSampler, texCoord);
  }
#else
  fn getDecalColor(decalIndex: u32, texCoord: vec2f) -> vec4f {
    return textureSample(decalTexture, defaultSampler, texCoord, decalIndex);
  }
#endif
So if you can get similar behavior from array textures, which are part of the core WebGPU spec, why bother with bindless at all?
The two main reasons are memory usage and texture sizes. As I mentioned before there can be nearly 2000 unique textures in use in this demo if you sprayed at least one of every possible emoji on the walls. In order to ensure that there’s enough space for that with a texture array you have to allocate the texture with enough layers for every possible texture up front. (Or re-allocate and do a costly copy every time you run out of space.) In my case since each emoji is rendered at 256x256 pixels that translates into a 2.6Gb allocation for that single texture at startup time! And that’s only if you can allocate that many layers in the first place! WebGPU only guarantees that array textures can have 256 layers, though some hardware allows more. Furthermore, most of that space is unlikely to be used.
For this specific demo, where the emoji decals are the main feature, that’s an acceptable tradeoff. But as part of a more complex rendering system it’s not very practical. When using bindless you only have to allocate texture memory as you actually use it, which means that a more typical set of decals can often fit under 100Mb.
The other issue is that every layer in an array texture must be the same size. As mentioned previously all of the emoji in this demo are rasterized at 256x256px (Chrome won’t render the glyphs at higher than 300px), so for the most part that’s fine. But the demo also allows you to shoot paint balls at the walls and those don’t need to be as large. Plus there’s some decals, like the browser logos, that we can rasterize at a larger size. When using a single array texture these all have to be scaled up or down to whatever average size we decide on. That doesn’t make a huge visual difference in this demo, but if you were to try to use this technique to texture an entire scene it would quickly show it’s limits.
Ultimately bindless texturing is the more flexible option that doesn’t force developers to make awkward quality and memory tradeoffs in order to access a large number of textures at once.
Bindless beyond textures
You’ll notice that throughout this post I’ve been referring primarily to bindless textures, and not bindless resources more generally. That’s because WebGPU will be exposing bindless in two tiers:
- Sampling Resource Tables
- Heterogeneous Resource Tables
Sampling resource tables are what we’ve been talking about so far. Exposed under the
'sampling-resource-table' feature (or 'chromium-experimental-sampling-resource-table' while the
feature is still experimental in Chrome), it allow sampled GPUTextureViews and GPUSamplers to be
added to the resource table.
Heterogeneous resource tables, or the other hand, will allow any resource type other than uniform buffers. This isn’t implemented in Chrome yet, and when shipped may not be availble on some hardware (primarily a few Android devices). When it arrives it will allow even more flexibility in the types of algorithms used.
Together these features close a significant feature gap between WebGPU and the underlying native APIs. We’re looking forward to seeing what developers build with the flexibility that they provide!